10 Tips to Pass your Demo with VIPKid

Hello Teachers! Teacher Stephanie here with 10 tips on how to pass your demo and interview with VIPKid.
After meeting all of the requirements (found here), the next step in completing the application process is to pass your demo

The demo can be recorded on your own schedule and sent in or you can schedule it to be done with an interviewer so that you have a person on the other end of the screen while you are teaching. I personally chose to record my demo and send it in because I wanted to make sure I had good lighting, my kids were taken care of (so I wouldn’t have any interruptions) and I could do it at a time convenient to my own schedule. However, I will admit that you do feel a little silly animatedly teaching to no one. GOOD NEWS! The goofiness didn’t stop but being self-conscious about it did. Being able to laugh at yourself is part of the job and it's what makes teaching so fun!
Updated Video Walk Throughs for the VIPKid Demo (Updated Sep 2019)


Let’s get to the tips!
10 Tips to Pass Your Interview for Online ESL Teachers

1) Be happy and have lots of energy
When you are teaching online, you have to be able to provide the engagement and entertainment to keep those kiddos focused and involved to learn the concepts you are teaching. Since you aren’t sitting right by the student, you have to have lots of energy. Think of the characters on Sesame Street. They are full of movement, smiles, and upbeat personalities (uh, except Oscar). They are over the top with movements and sounds and that make it perfect for engaging young children from across the screen.
Here are a few suggestions to add to parts of your demo, wherever it feels natural to you:
Examples:
- High fives
- Thumbs up
- “Are you Ready?” (Point to the camera)
- Small Dancing
- Jazz Hands
- Small sound effects (whistle, pop with mouth, snaps, claps, raspberries)
Have fun and be creative. Just add little pops of these things throughout the lesson so you don’t get too off track but you are still having a good time with the student.
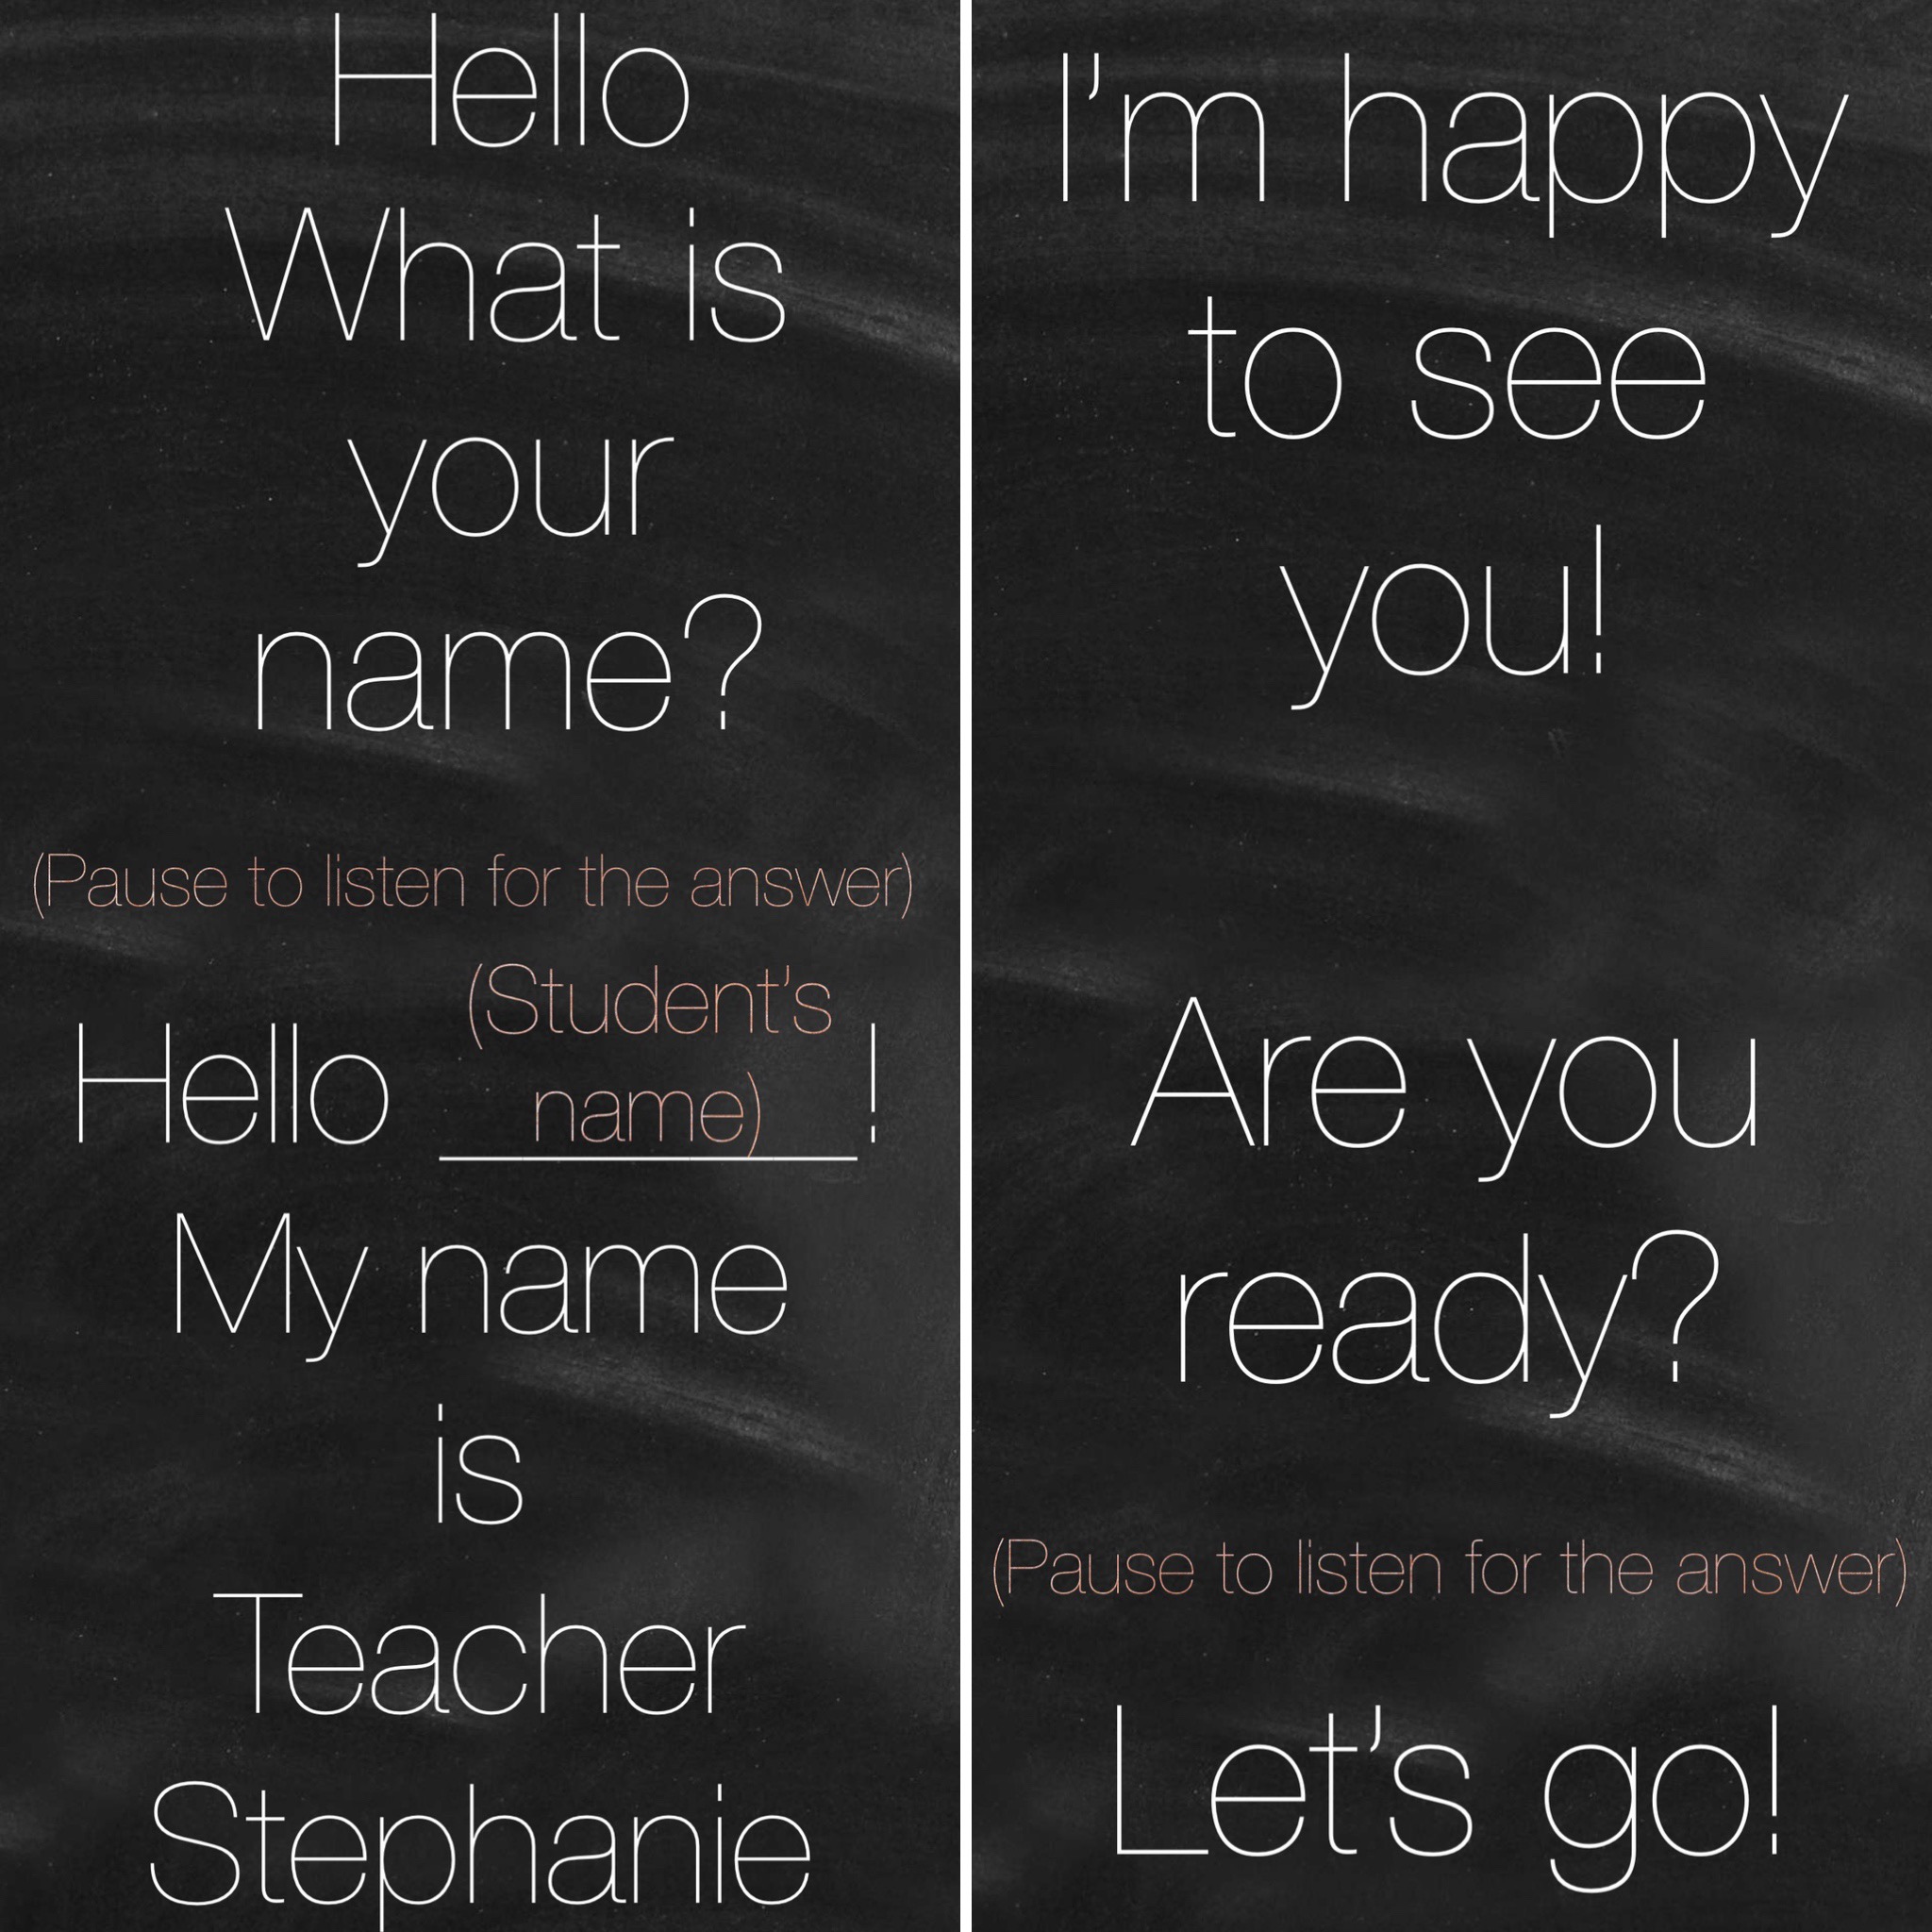
2) Speak slowly
These cute kiddos are learning a whole new language at a very young age. When you speak at a normal speed it is extremely difficult for them to hear the correct sounds, pronunciation, inflection, and specific words. Speak very slowly and work on annunciation. This is another part of teaching with VIPKid that takes practice but becomes very natural over time.
Practice Exercise:
Here is my intro for each class I teach. Practice saying this phrase taking up a whole 30 seconds of time (use a stop watch or clock to pace yourself). Remember to pause for answers and show that you are listening and waiting for a response after the question. This should help you see the pace that you need to have when speaking:
3) Simple language
Since we are English teachers we obviously have to use the correct grammar when speaking. Make your language simple and easy to understand by using 2-4 word sentences.
Example:
Imagine you are trying to teach the A sound (as in apple).
Bad example:
“This is the letter A. The letter A says “ah” “ah”. Can you make that sound? Where is the letter A? This is an apple. I like to eat apples. A is for apple. Apple starts with the letter A.
Notice all of the unnecessary language used here to teach the sound of the letter A and the word Apple. It all makes sense to a fluent English speaker but so many words here will confuse the students learning this concept.
Good example:
“Look! A! (student Repeats “A”)
Yes! A! (student Repeats “A”)
Good job! “Ah. Ah. Ah.” (student repeats “ah. Ah. ah.”) (Thumbs up) Yes!
Ah ah Apple! (student repeats ah ah apple). Yes! (High five)
Ah ah apple! (student repeats ah ah apple). Wow!
Circle A (circle motion).student circles A (Clapping) Great!
Circle Apple (circle motion) student circles apple Yay! (Small dancing)
Do you see how all the words are clear and direct. Most phrases are two or three words and they are very clear on what the student is supposed to do and what they are learning. Notice how I also included lots of movement to create energy and positive reinforcement with each effort made by the student. This is also helpful when you use a whiteboard, flashcards and TPR (total, physical, response) to get your point across. More on that below!
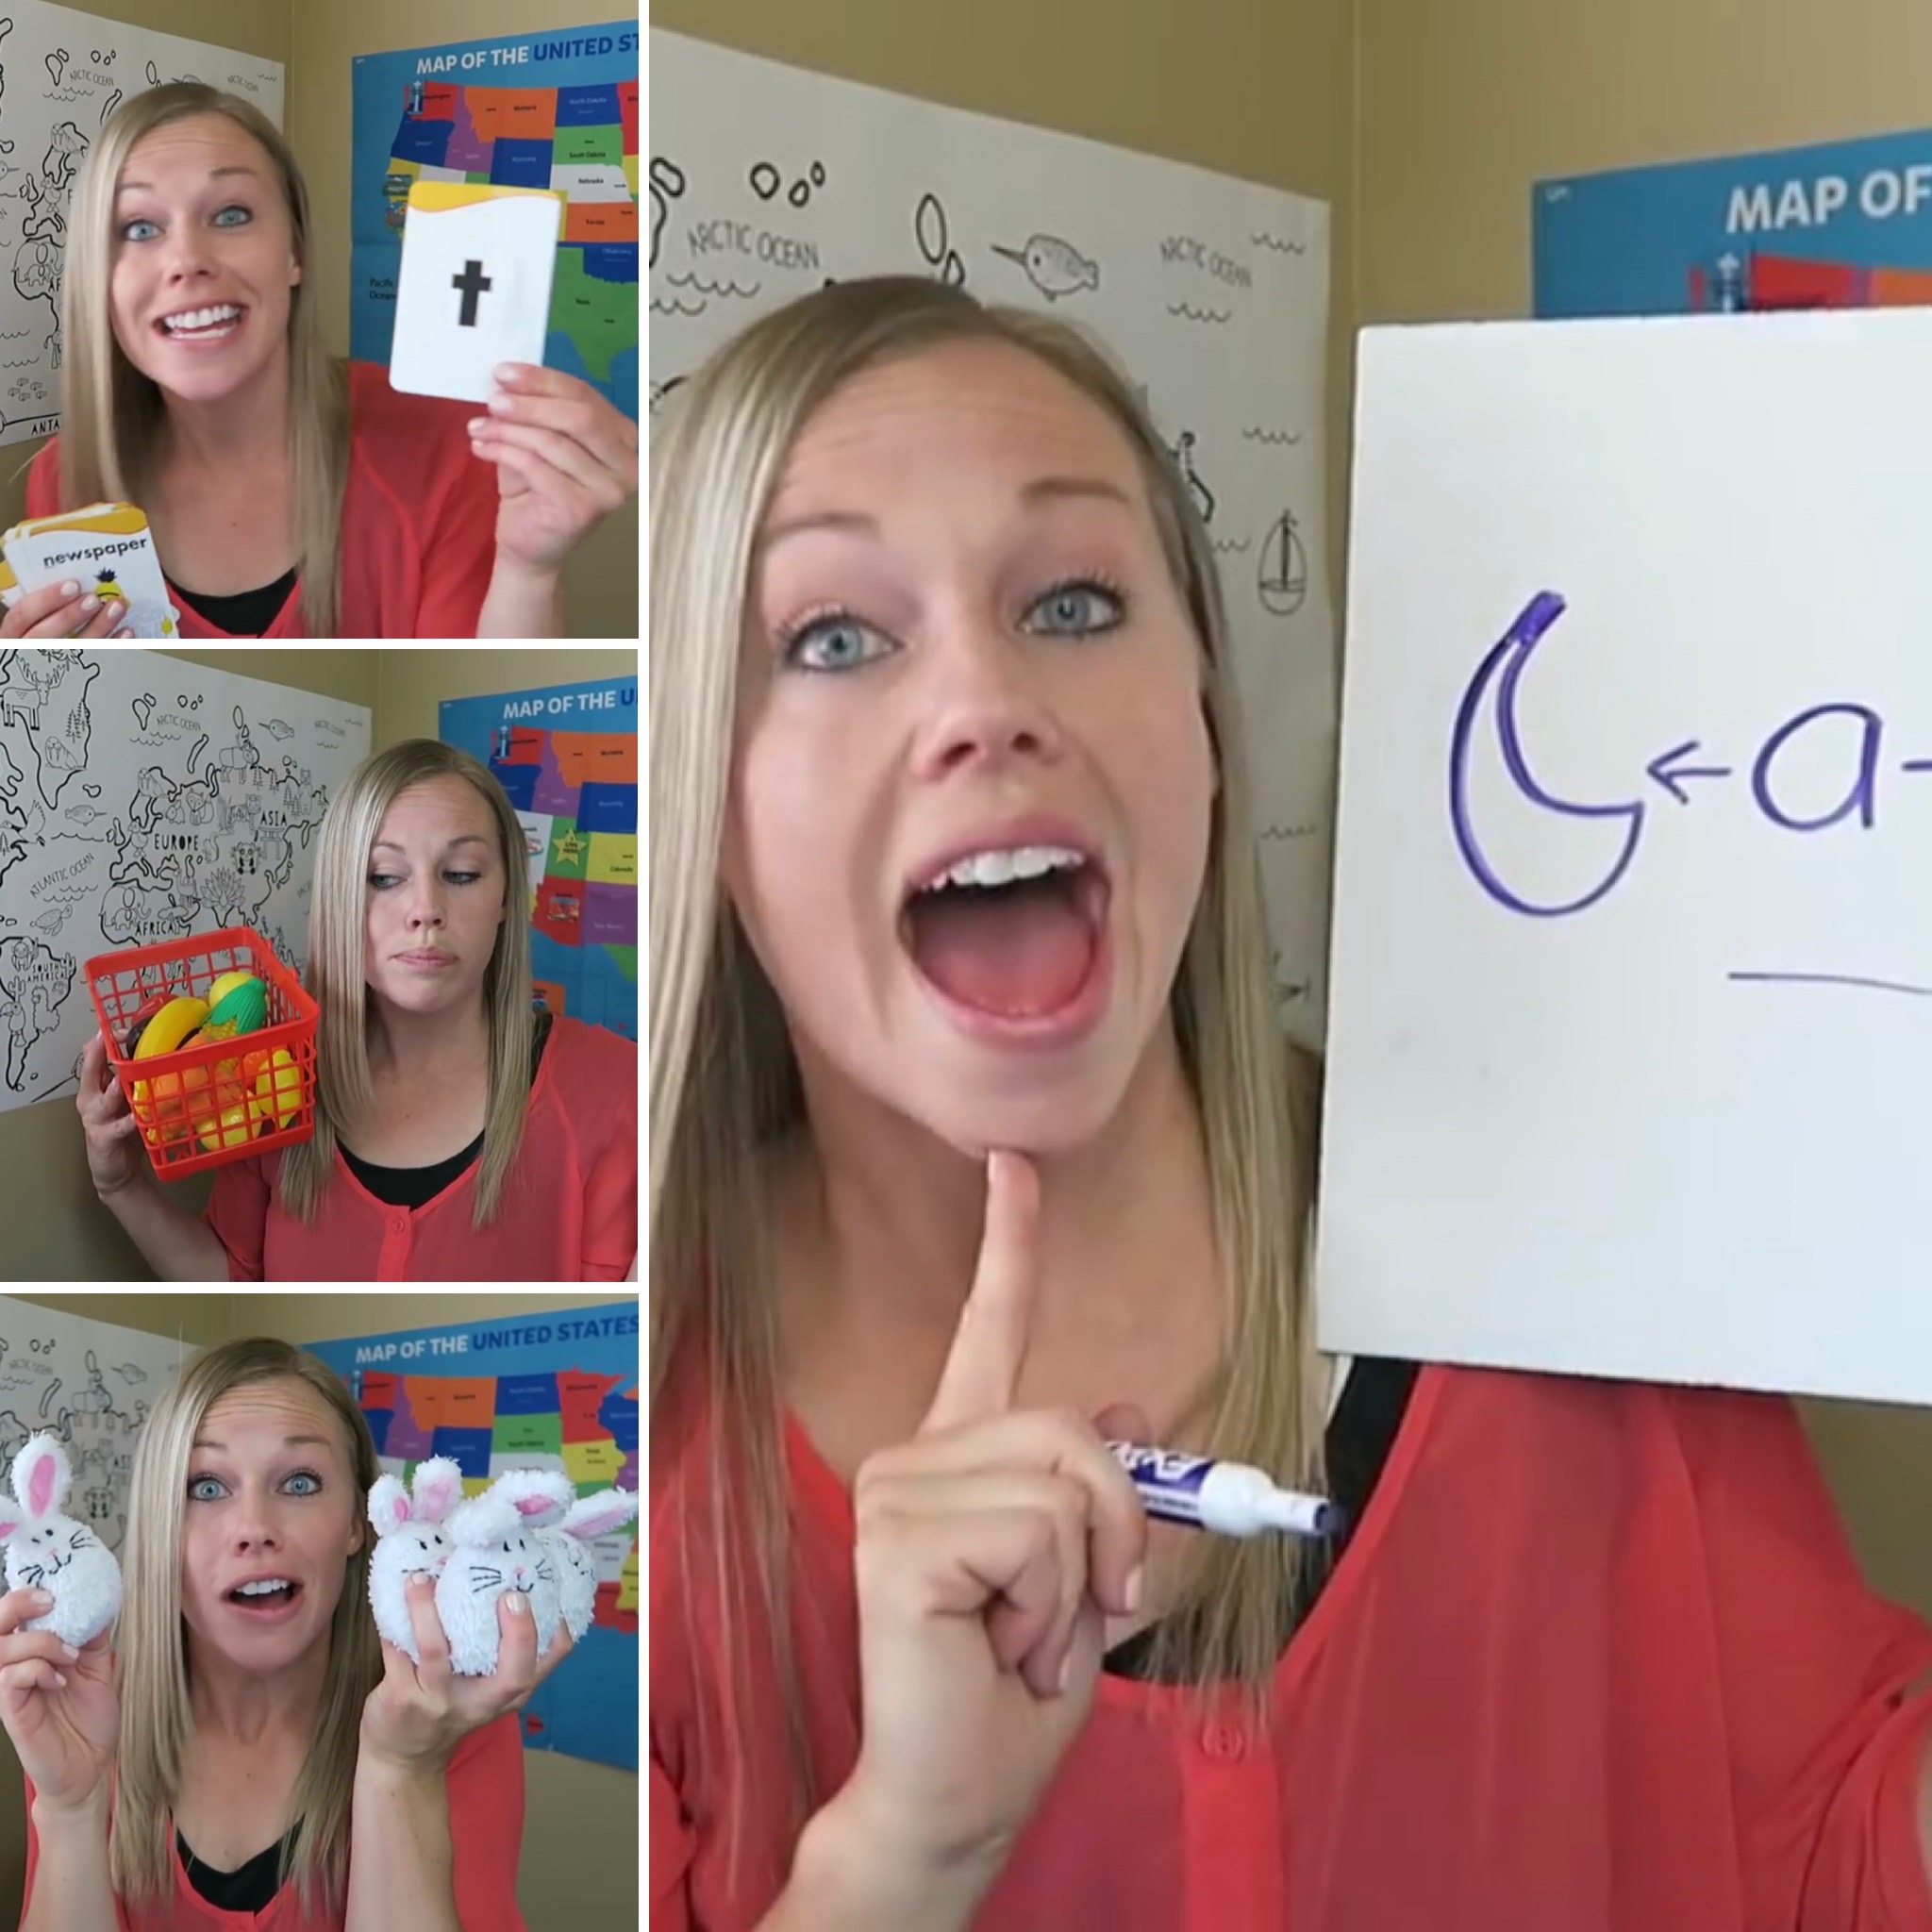
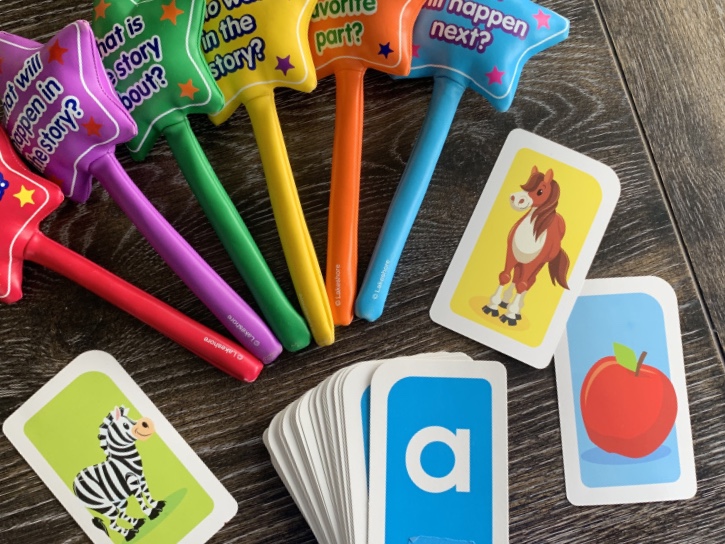
4) Props
You don’t need anything fancy as far as props go. Some teachers like to make it minimal and others love to have props related to each learning Level and each learning objective.
Here are a few examples that will help you for most lessons and then you can see if you want to add more as you begin teaching.
- Whiteboard and marker- this makes it so you can draw anything you are trying to explain. Don’t worry about being a great artist. My students love to see my bad attempts at drawing and then out-doing me with their own masterpieces.

- Letter Flashcards
- Puppet or stuffed animal - something you can use to show conversation
- Play food
- Reward System - Find a star by picking a number, Have the spider move closer to the web, Pick a number on one of your hands with a prize inside, add a tooth to the smiley face. I made a Giant smiley face for my classroom that you can see in this video. It was a hit with the littles!
Practice moving with your props on camera. You want to make sure that you can see yourself and the prop on the screen. Practice moving it close and far away and notice the position it needs to be so it doesn’t glare or isn’t clear. I don't want to see any cut off heads out there! That didn't come out right...
5) TPR
Total
Physical
Response
This is nonverbal communication that helps you explain and demonstrate the words you are using while you speak.
Practice exercise:
Try using your hands, eyes, face, and body in some way to explain almost every word in the following sentence
Can you circle the 1?
6) Model
This goes along with TPR. You want to show the students what you want them to do with your own actions. It’s a common teaching method known as I do, We do, You do. Start with just showing them, then do it together and gradually have them do it on their own.

Example:
When I teach the letters A and B I hold up both flash cards and put them close to the screen one at a time, saying each letter slowly. I keep switching the letters as I move them close and far from the screen saying” A…..B….A….B….” I point to the student and my mouth to indicate that the student should do this too. And soon we are saying it together when we see each letter. The last step is for me to stop saying the letters but have them keep going. To add some fun, I start going faster and faster until I eventually drop the cards and collapse on the ground with dramatic heavy breathing. The kids love it every time!

7) 70/30 student teacher output with a Gradual Release:
The student should be speaking 70% of the time, and the teacher should be speaking 30% of the time. So, just like in the example above, at first the student and teacher are 50/50 with speaking and repeating back every word. Then, it’s slowing transitions to just the student speaking. VIPkid wants to have the student speaking most of the time and not just staring at a screen for the 30 minutes. That’s what Netflix is for…….kidding! Kind of...
8) Synthetic Phonics
This is just the specific letter sounds without any other sounds coming with it. Since this is incredibly difficult to explain through writing, here are two videos that review the letters and their sounds.
Sythetic Phonics with VIPKid Teacher Kevin

Teaching the word m-a-t
Bad Example:
“Muh-ahhh-Tuh”
Good Example:
“Mmmmm-aaaahhh-ttttt”
You might not see a difference there but those little uh’s make the word say “Muhatuh” instead of “Mat” when you blend the sounds together. It can be really confusing for the learner to hear the correct sounds without using synthetic phonics.

9) Background & Lighting
For her background, Nancy uses these adorable US and world maps that she found at Target. I use a blue fabric over a magnetic board so that I can hang magnet props and rewards behind me. You can make yours as simple or as grand as you want it to be. As you teach you might find that you want to go in a different direction with your classroom and that’s ok. Make sure that it is educational by using maps, letters, colors, shapes, etc. Find what works for you and go for it. This is your chance to make your classroom unique to you and your personality and interests.

As far as lighting goes, you want to make sure that everything is visible and that you don’t have any shadows on your face when you are teaching. Nancy uses this lamp from Ikea and I use two garage/workshop hanging lights that I got from Home Depot. Make sure everything is bright and visible.
10) Have fun
One of your goals with every class should be to make the student smile and enjoy class. It makes them more engaged and increases learning. And it also increases the chances that the student books you again and becomes a regular in your classroom. Making the class enjoyable can decrease behavior problems (as long as you don’t get too crazy) and keep them looking at the screen to see what you do next. It is so important to build that relationship with the student and what better way to start then by having a little bit of fun? And if I’m being honest, it totally makes getting up so early very worth it. I begin my day with singing, dancing, and goofing around all while a sweet child giggles on the other side of the planet. It isn’t really part of your pay but it is certainly rewarding in it’s own sense.

Here are some examples to add more fun to your class:
- put the prop in your mouth or hide it in the classroom and try to find it with the student
- fall down
- jump up
- talk loud or soft
- sing or play a small instrument
- turn the lights off or on
- dance
- yawn and pretend to sleep
- wear a funny hat or headband
- play "Simon Says" or "Pictionary"
That’s it! If you are looking to apply to VIPKid here a post all about the application process and remember to use the code NANCY0002 and she will be happy to be your mentor. If you are looking to see these tips in action, watch this video from Nancy with excellent examples on each piece of advice on your demo.
Good Luck on your interview and demo and come back to the blog for more posts on all things VIPkid.
Happy Teaching!

